Posts

Showing posts from April, 2023

Basket Weaving

Image
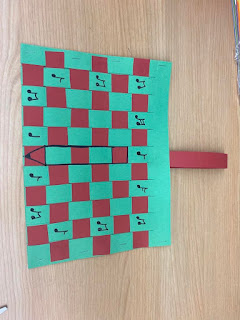
 Description: For this project we first had a short presentation where we learned about the history of basket weaving. We learned weaved baskets were often used to carry various items and even babies. Many baskets had various designs making them unique as well. To begin our project we folded a large sheet of construction paper in half. We then traced a stop line and cut slits for our weaving. We then measured out and cut strips of paper to use to weave. We practiced weaving the paper in and out of our slits to create a checkered look. At the end we stapled the sides, decorated our baskets, and added handles to make it functional. Extension: An extension activity for this would be to use the weaving technique with cloth to create a larger project such as a class banner or a rug. 

Underwater Print Making

Image
 Description: For this project we used three different pieces of paper to complete our project. First we had to sketch an underwater design on a thin piece of paper. Next, we set the thin paper with our drawing over a piece of styrofoam paper and traced the drawing with a pencil onto the styrofoam paper. Once our drawings were traced we went over our outline once more with a pencil to deepen our outline. Then we colored our design being sure to avoid the outline. We then got our watercolor paper wet and placed our colored drawings upside down on top of it and rolled them together to transfer the design.  Extension: This activity could be used for math to show reflections over an axis. If you draw a shape, image or a line one way and then stamp it onto another piece of paper it would cause the image to be flipped. When setting each page side by side it would mimic a reflection over the y-axis. 

Chain Links Design

Image
  Description: To start off this lesson we learned about how many professions use grids such as fashion designers, interior designers, and landscapers. We then moved onto the objective for the day which was to make a design using chain links and a grid. We worked in partners and chose three colors to fill in our grid with as our design layout. We then cut one inch strips from three white pieces of paper along with strips from three colorful pieces of paper. We learned how to create the individual chains and how to link them together by following the patterns on our grids. We then put them all together on a stick to hang up and our image was a rainbow.  Extension: An extension activity for this could be used as a countdown to a reward. Each day students have the opportunity to be rewarded and add one link to their class chains. Once a picture is shown with all their chains together the reward will be given. 

Fish Weaving

Image
 Description: For my lesson I taught about earth's oceans, the fish in them, and where they live. Once this aspect was done, we used a stencil to trace out our initial fish. We then folded and cut slits into our fish to give us space to weave papers through. Next, we cut our individual strips of paper and used a weaving technique to create fins for the fish. We added an eye and glued on extra scales with excess paper. I then set students free to create their own habitats for their fish to live in that included two elements found in fish habitats.  Extension: This lesson could be adapted when learning about other animals and their habitats as well. Students could create their own animal and incorporate weaving to show scales, feathers, wings or arms and legs. They could also create habitats incorporating elements relevant to their animals and their homes.  

Mandala

Image
 Description: For this lesson we learned about mandalas. We saw various examples that varied in shape, color, and patterns. We learned that mandalas are made by repeating patterns. We first learned about four diverse techniques for painting. We practiced each technique and then had to decide on two we would incorporate into our mandalas. We also had to design patterns on two separate triangles and then chose one design for our mandalas. We drew our chosen pattern eight times, once for each triangle section of our circle, and then were able to paint. Once our mandalas were painted, we cut them out and glued them on a sheet of construction paper as a background. Extension: Madalas can be used in geometry to help break apart a circle. Students could design their own mandalas. They would then have to mark a starting point and measure the angle between each line in reference to the starting point.

Cupcake Drawing

Image
 Description: For this lesson we learned about an artist that liked to draw food. We worked on making three different cupcakes using three different media. We worked on drawing the cupcakes first and then outlining them. We then got to color one with crayons, paint one with watercolors and then color the last one with markers. We got to pick the colors we wanted to use as well. Extension: An extension activity I could use for this lesson would be for students to each draw a picture or a symbol that represents themselves as an introduction activity. I would then have them recreate the picture or symbol two more times using three various media total and to pick their favorite picture to present to the class. 

Hidden Safari

Image
 Description: For this lesson we had a short presentation about an artist that was known for creating jungle scenes. We then worked on creating our red glasses first with construction paper and see through red plastic. Then we moved onto drawing an animal by flipping a picture of an animal upside and draw by only looking at the lines rather than the picture as a whole. We drew the picture in blue but then used warm colors such as red, orange, and yellow to cover the picture with various patterns. Once this was completed, we put on our red glasses and were able to see the blue picture underneath.  Extension: This activity could be used for a class wide scavenger hunt. Students would have to draw various shapes in blue on their paper. I would then have the student hide their shapes with patterns created by yellow, orange and red crayons. We would then set these pictures around the room and students would have to use their red glasses to find each shape. 

Vincent Van Gough

Image
 Description: For this project we did a small history lesson on Vincent Van Gough. We learned about how he got started as an artist. Van Gough often showed movement in his artwork through the use of lines, patterns and texture. After we learned about him it was our turn to create our own landscapes incorporating the use of tissue paper for our background and other medium (I used oil pastels and construction paper) to create movement in our landscapes. Extension: An extension activity for this might be to pair this with a science lesson studying habitats of animals. Students could use diverse media such as construction paper, tissue paper, crayons and markers to create accurate habitats that show movement. 

Elements and Principles of Design

Image
 Description: For this project we had to capture twelve images of the twelve principles and elements of design which are shape, line, texture, space, value, color, contrast, balance, rhythm/movement, unity/variety, emphasis, and patterns/repetition. We then had to chose five to represent in our blog. For my five I chose contrast, emphasis, movement, color, and shape. Extension: An extension activity could be to allow students to walk around the room and identify items that are each color of the rainbow. Students would keep track of how many items they found of each color and use the information to create bar graphs and compare with others in their class. Contrast Emphasis Movement Color Shape

Dot Day

Image
 Description: For Dot Day we read a story about a young student who did not believe her work was good enough. Her teacher however found value in her work and recognized it. This in turn opened a whole world of art and creativity for the student that she hadn't had before. On dot day we used watercolors and other various media such as crayons to make our very own dots.  Extension: Another activity we could do for a dot day would be to allow students to create Christmas ordainments. These ordainments could be designed to show one individual trait about each student. These ordainments could then be brought together to place on a paper Christmas tree as a class project to show each students' individuality and how they all come together to form one class.